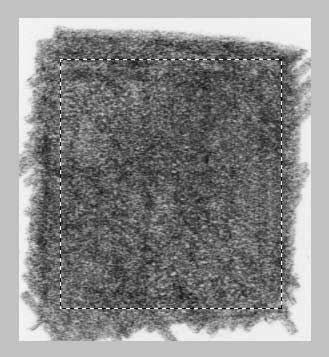
Step 1: Evenly shade in a dark rectangle with your usual pencil and paper (a square inch or so), then scan it at 100%. In Photoshop, use the Rectangular Marquee to make a selection within your shaded rectangle. See below.

Step 2: Edit (from the top Menu bar) > Define Pattern, and give it a name (in the example it's "My Pencil").
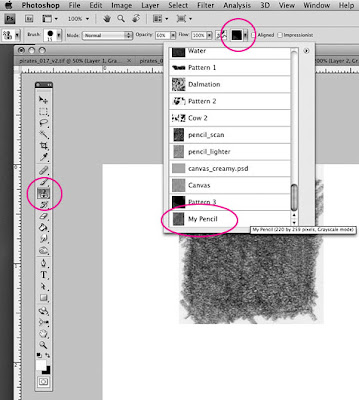
Step 3: Now choose the Pattern Stamp tool (it's nested with the Clone Stamp) from the Tool Panel. You'll notice that the Menu/Tool Options at the top of the window shows a thumbnail of the current Pattern. Click on the thumbnail and choose the Pattern that you just created.

Above: The Pattern Stamp (it's nested underneath the Clone Stamp) and the thumbnail for the Pattern Library
Now draw in your Photoshop image window, and you're drawing with a scan of your pencil line.
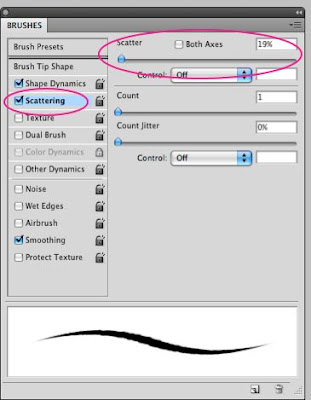
Step 4 (optional): You might try adding a little Scattering from your Brush Panel (F5). Scattering roughs up the edge of the stroke a little bit, which mimics drawing on a slightly textured surface.

Step 5 (optional): You could also set your Brush mode in Menu/Tool options to "Multiply" so that your line gets darker with each stroke (like an actual pencil). See below:

You can also check out the "Artist Surfaces" library (hit the drop-down menu in the Pattern Library; top right hand corner). I've found that some of the options in the "Artists Surfaces" library are just as good as my own scanned samples.
